Overview
Next.js (opens in a new tab) is a React framework for building full-stack web applications. You use React Components to build user interfaces and Next.js for additional features and optimizations. The main features are Routing, Rendering, Data Fetching, Styling, Optimizations, and TypeScript. Read their documentation (opens in a new tab) for more detailed features.
This section of the documentation will cover how to quickstart developing the Next.js application using ROQ SDK for BaaS and add features such as login and signup buttons.
Quickstart
Learn how to create a Next.js project, install ROQ BaaS SDK, add signup and login buttons, and query data from the ROQ BaaS.
Prerequisites
Before we can begin, we must first create an initial project. Please create a new project by signing up in ROQ Console (opens in a new tab). In this Console, when you create a project, you will also automatically create a Backend-as-a-Service or BaaS instance that provides APIs.
Create a Next.js application
To initiate a new Next.js project, execute the following command in your workspace directory:
npx create-next-app@latestAnd the follow along the installation questions:
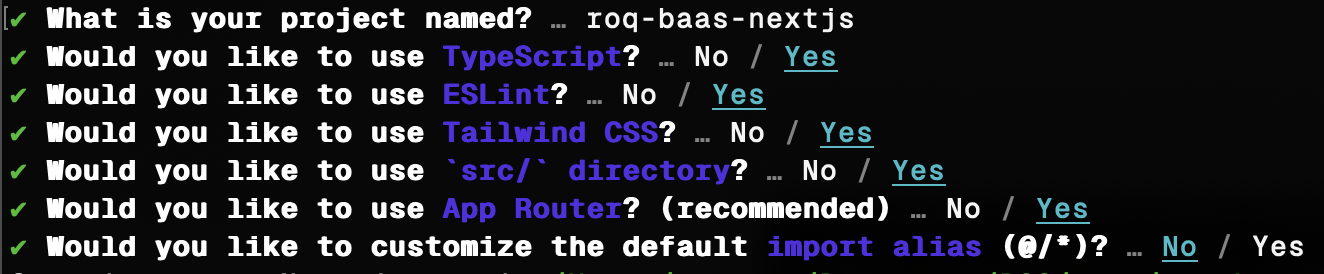
The ROQ Platform supports both Next.js' Page Router and App Router architectures. To learn more about the difference, please refer to Next.js documentation (opens in a new tab).
Install ROQ BaaS SDK
Install the necessary ROQ SDK for our project by running these commands:
npm install @roq/nextjs --save
npm install @roq/cli --save-dev
Copy .env from ROQ Console
Besides SDK, we need to copy the environment file from the ROQ Console. Go to the project console (opens in a new tab), select the project and the environment, and then copy the environment values from the Console.
For local development, we can use the Local Development environment.
After copying the environment values, create file .env in the root directory of the Next.js project and paste the environment values.
Make sure to include the .env file in the .gitignore file. So that the environment variables are not exposed to the public.
Generate SDK
Our Next.js project will work with ROQ by using a customized generated SDK. This process is necessary to generate Prisma types for SDK.
To generate the SDK, run the command below:
npx @roq/cli generateIf any changes are made to the project schema or entities after the project creation and SDK generation, we can update the SDK by running the command npx @roq/cli generate again. To modify the project schema, we can use the Schema Editor available on the ROQ Console.
The command generates a customizable SDK based on the Prisma BaaS schema and chosen environment. The default location for the code generated is src/lib/roq.
The next steps will be different depending on whether you are using Next.js with App Router or Page Router.
Configure Next.js with ROQ authentication
To make our Next.js project seamlessly work with ROQ Authentication, we need to configure the project first.
Create folders src/app/api/auth/[...roqAuth] and add file route.ts then fill with this code:
import { RoqAuth } from '@roq/nextjs';

const handler = RoqAuth({
  hooks: {
    onRegisterSuccess: async ({ user }) => {
    },

    onLoginSuccess: async ({ user }) => {},
  },
});

export { handler as GET, handler as POST }
After that, we can add sign-in and signup buttons, and the user will be redirected to the other page if the authentication process is successful.
Open file src/app/page.tsx and fill with this code:
'use client'
import { roqBrowserClient } from "@/lib/roq/roq-client";

export default function Home() {

  const handleSignUp = async () => {
    await roqBrowserClient.signUp('default', { postLoginRedirect: 'http://localhost:3000/user' });
  };

  const handleSignIn = async () => {
    await roqBrowserClient.signIn('default', { postLoginRedirect: 'http://localhost:3000/user' });
  };

  return (
    <div className="flex w-full h-screen bg-zinc-950 justify-center items-center">
      <div className="flex flex-col justify-start items-center gap-[34px]">
        <div className="text-white text-[32px] font-bold leading-[38.40px] tracking-tight">
          Welcome
        </div>
        <div className="flex justify-center items-start gap-3">
          <div className="px-[18px] py-1.5 bg-indigo-500 rounded shadow flex justify-center items-center">
            <button
              onClick={handleSignIn}
              className="text-white text-[15px] font-bold leading-relaxed tracking-wide"
            >
              Sign in
            </button>
          </div>
          <div className="px-[18px] py-1.5 bg-indigo-500 rounded shadow flex justify-center items-center">
            <button
              onClick={handleSignUp}
              className="text-white text-[15px] font-bold leading-relaxed tracking-wide"
            >
              Sign up
            </button>
          </div>
        </div>
      </div>
    </div>
  );
}
The signUp() method will redirect the user to the registration form for the signup process. To specify the registration form variant, substitute the default key with the corresponding key obtained from the project console.
In a parallel manner, the signIn() method will redirect the user to the login form for the sign-in process. To specify the login form variant, substitute the default key with the corresponding key obtained from the project console.
To get the registration form variant key, go to the project console (opens in a new tab), select Authentication, and then click the Design menu.

For example, the registration form variant shown is Admin(administrator). This means the registration form variant name is Admin and the key is administrator.
Create another page.tsx in folder src/app/user and fill it with this code:
'use client'
import { roqBrowserClient } from '@/lib/roq/roq-client';
import { useRoqPlatformUserProfiles, useRoqPlatformRoles } from "@/lib/roq";

export default function Home() {

  const {data} = useRoqPlatformUserProfiles()
  const {data: rolesData} = useRoqPlatformRoles({
    withUserCount: true,
    filter: {
      userId: {
        equalTo: data?.userProfiles.data[0].id
      }
    }
  })

  const logoutHandler = () => {
    roqBrowserClient.signOut();
  };

  return (
    <div className="flex w-full h-screen bg-zinc-950 justify-center items-center">
      <div className="flex-grow flex-shrink-0 py-[241px] flex justify-center items-center">
        <div className="flex flex-col items-center gap-8 w-full">
          <h1 className="text-white text-[32px] font-bold leading-[38.40px] tracking-tight">Dashboard</h1>
          <div className="flex flex-col items-center gap-2">
            <p className="text-gray-400 text-base font-normal leading-tight tracking-tight">
              You are currently logged in as:
            </p>
            <p className="text-white text-xl font-bold leading-normal tracking-tight">
              {data?.userProfiles.data[0].email}
            </p>
          </div>
          <div className="flex flex-col items-center gap-2">
            <p className="text-gray-400 text-base font-normal leading-tight tracking-tight">
              User role:
            </p>
            <p className="text-white text-xl font-bold leading-normal tracking-tight">
              {rolesData?.roles.data[0].name}
            </p>
          </div>
          <div className="px-[18px] py-1.5 bg-indigo-500 rounded shadow flex items-center">
            <button onClick={logoutHandler} className="flex items-center gap-1">
              <span className="text-white text-[15px] font-bold leading-relaxed tracking-wide">
                Log out
              </span>
              <div className="w-6 h-6 flex justify-center items-center">
                <svg width="24" height="24" viewBox="0 0 24 24" fill="none" xmlns="http://www.w3.org/2000/svg">
                  <path d="M15.75 9V5.25C15.75 4.00736 14.7426 3 13.5 3H7.5C6.25736 3 5.25 4.00736 5.25 5.25V18.75C5.25 19.9926 6.25736 21 7.5 21H13.5C14.7426 21 15.75 19.9926 15.75 18.75V15M18.75 15L21.75 12M21.75 12L18.75 9M21.75 12H9" stroke="#FFFFFF" strokeWidth="1.5" strokeLinecap="round" strokeLinejoin="round" />
                </svg>
              </div>
            </button>
          </div>
        </div>
      </div>
    </div>
  );
}
After successful signup, the page will be redirected to the user page, and Next.js will get a token that will be used for any further request to the REST API from ROQ Baas.
Start the Next.js application
Everything is setup. Now, we can start the development server with this command:
npm run devAnd in the browser, go to http://localhost:3000. Sign up, and after that, you will be redirected to the user page with the user's email shown on the page.