Create project form in Next.js
In this tutorial, we will build a form to save data to ROQ using Next.js. We will use the ROQ SDK to save data to the database.
Let's build a simple SaaS works marketplace for freelancers. The application will have two user roles: Business Owner and Freelancer. The Business Owner will be able to create projects, and the Freelancer will be able to see the available projects. This tutorial will only cover the Business Owner role, we will cover the Freelancer role in the next tutorial.
Project setup
Create an application
To create a new application you need to have a ROQ Console account. If you don't have one, please create an account at ROQ Console (opens in a new tab) and read this guide to learn how to create an application.
If you want to follow in detail in this tutorial, these are the application configurations we used in the ROQ Console:
Create registration form variants
We need to create a registration form variant for the Business Owner and Freelancer roles. So when the user register or login will be redirected to the correct page based on the role.
Go to the ROQ Console (opens in a new tab) and click the Authentication menu. Then click the Design and then create a new registration form variant using the + Create Form button.
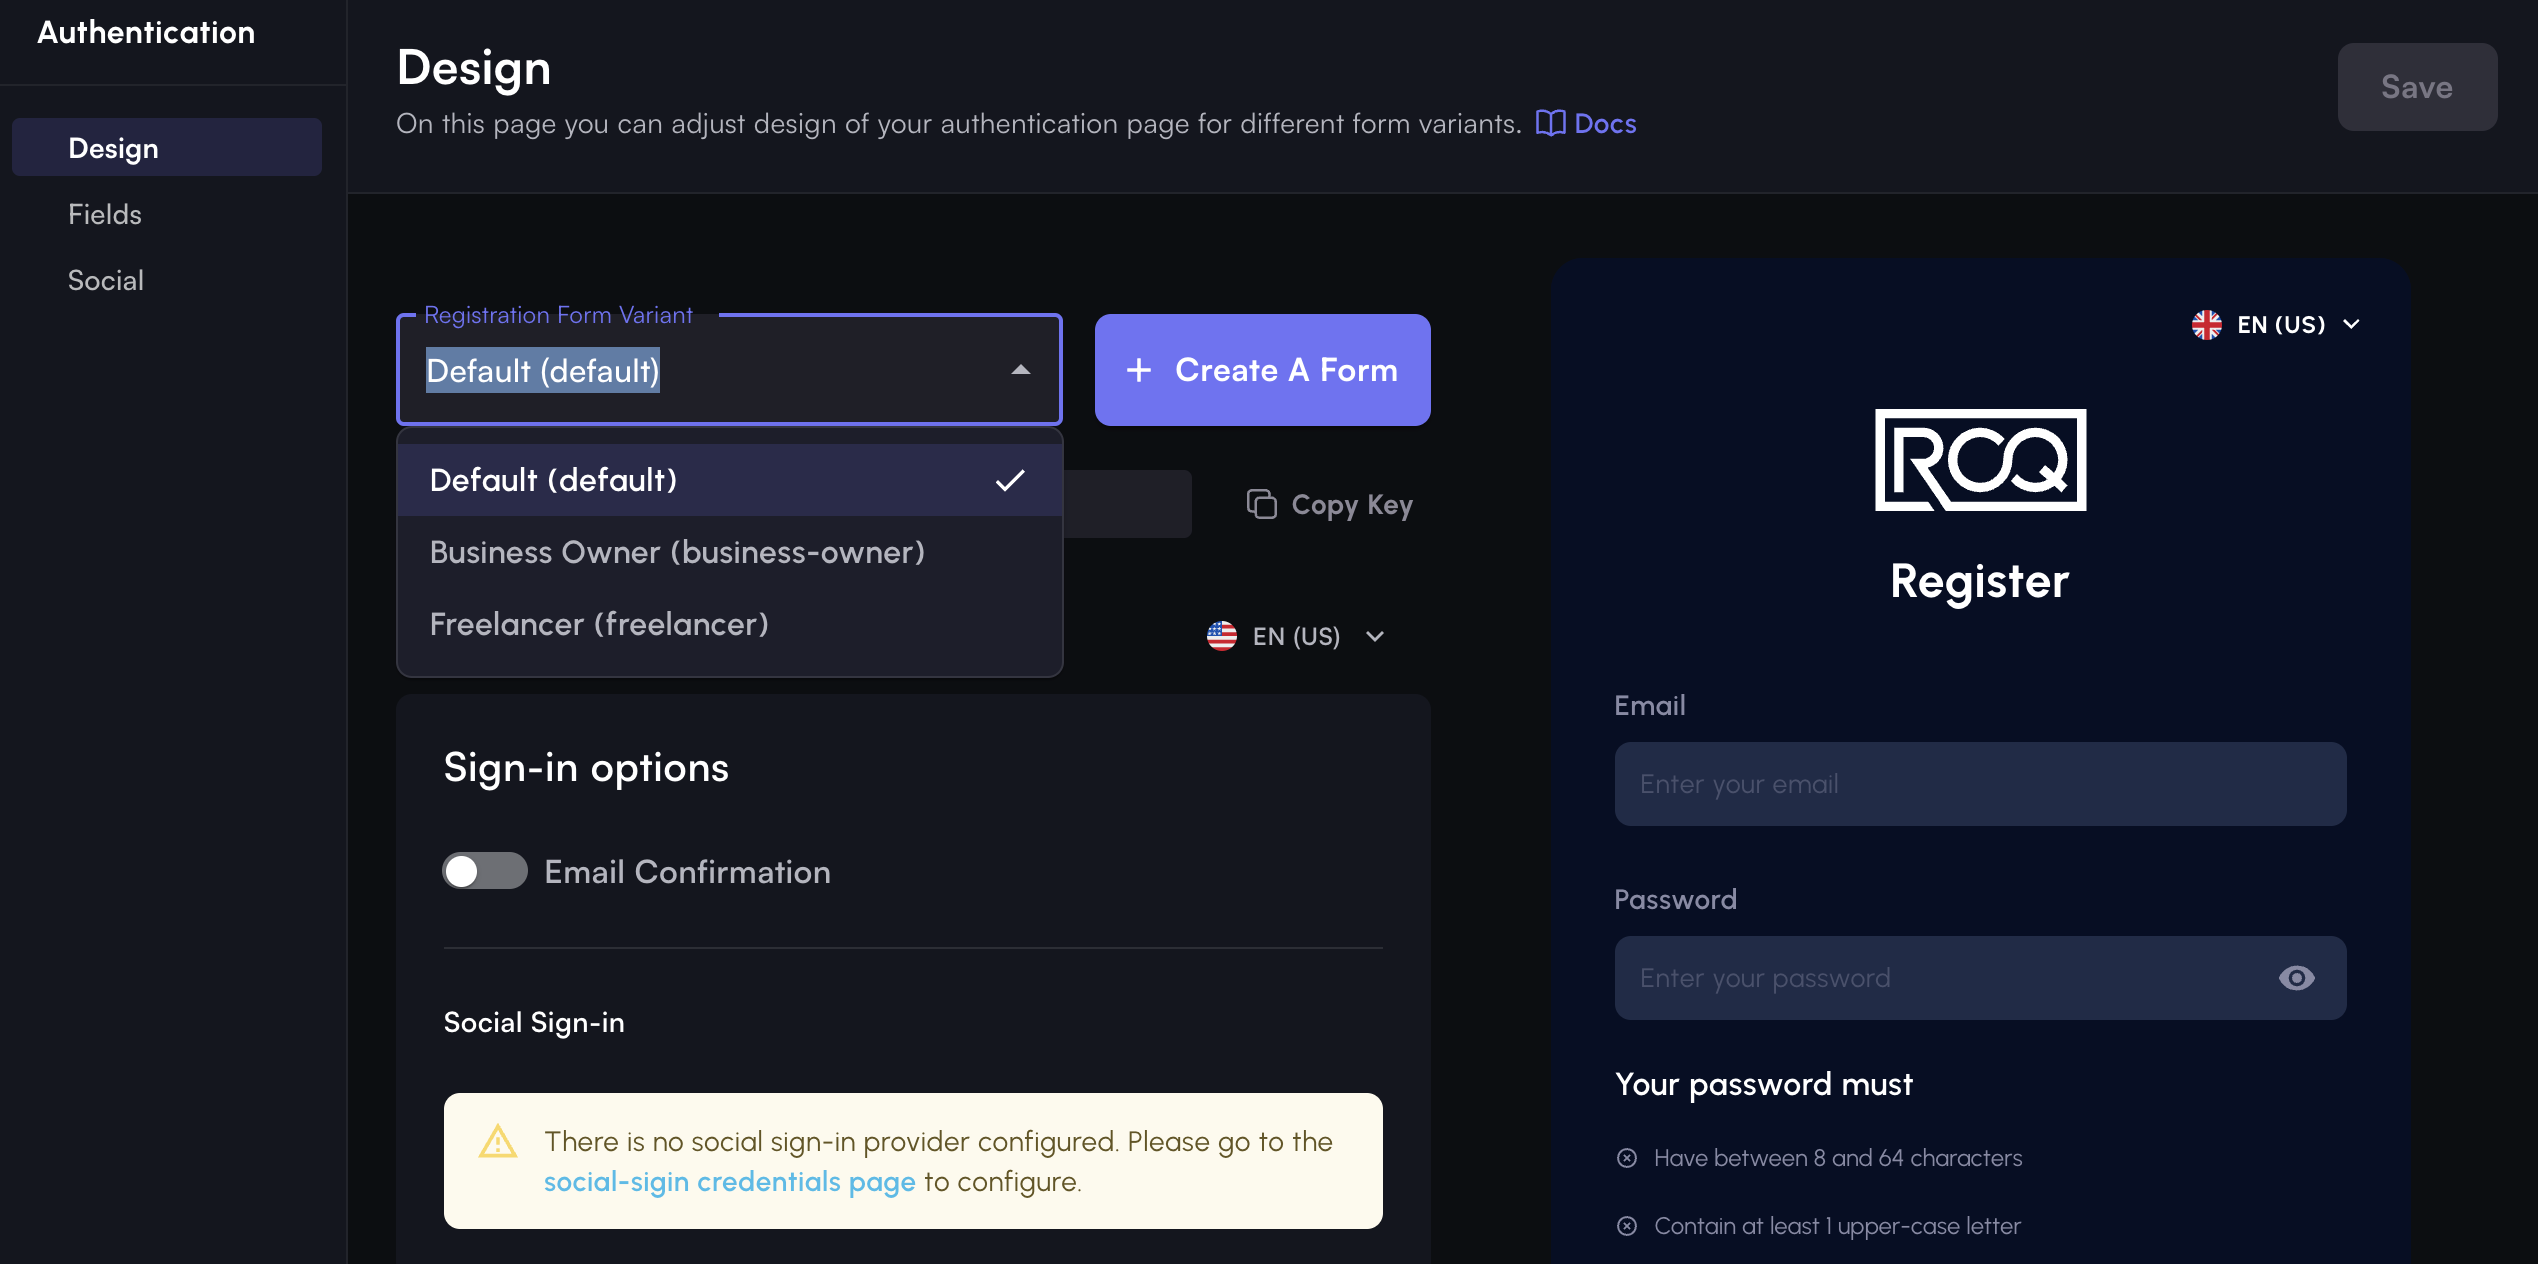
Create one each role for Business Owner and Freelancer. The registration form variants key should be business-owner and freelancer and these will be used in the code later.
Create user roles
The user roles we use are: Business Owner and Freelancer.
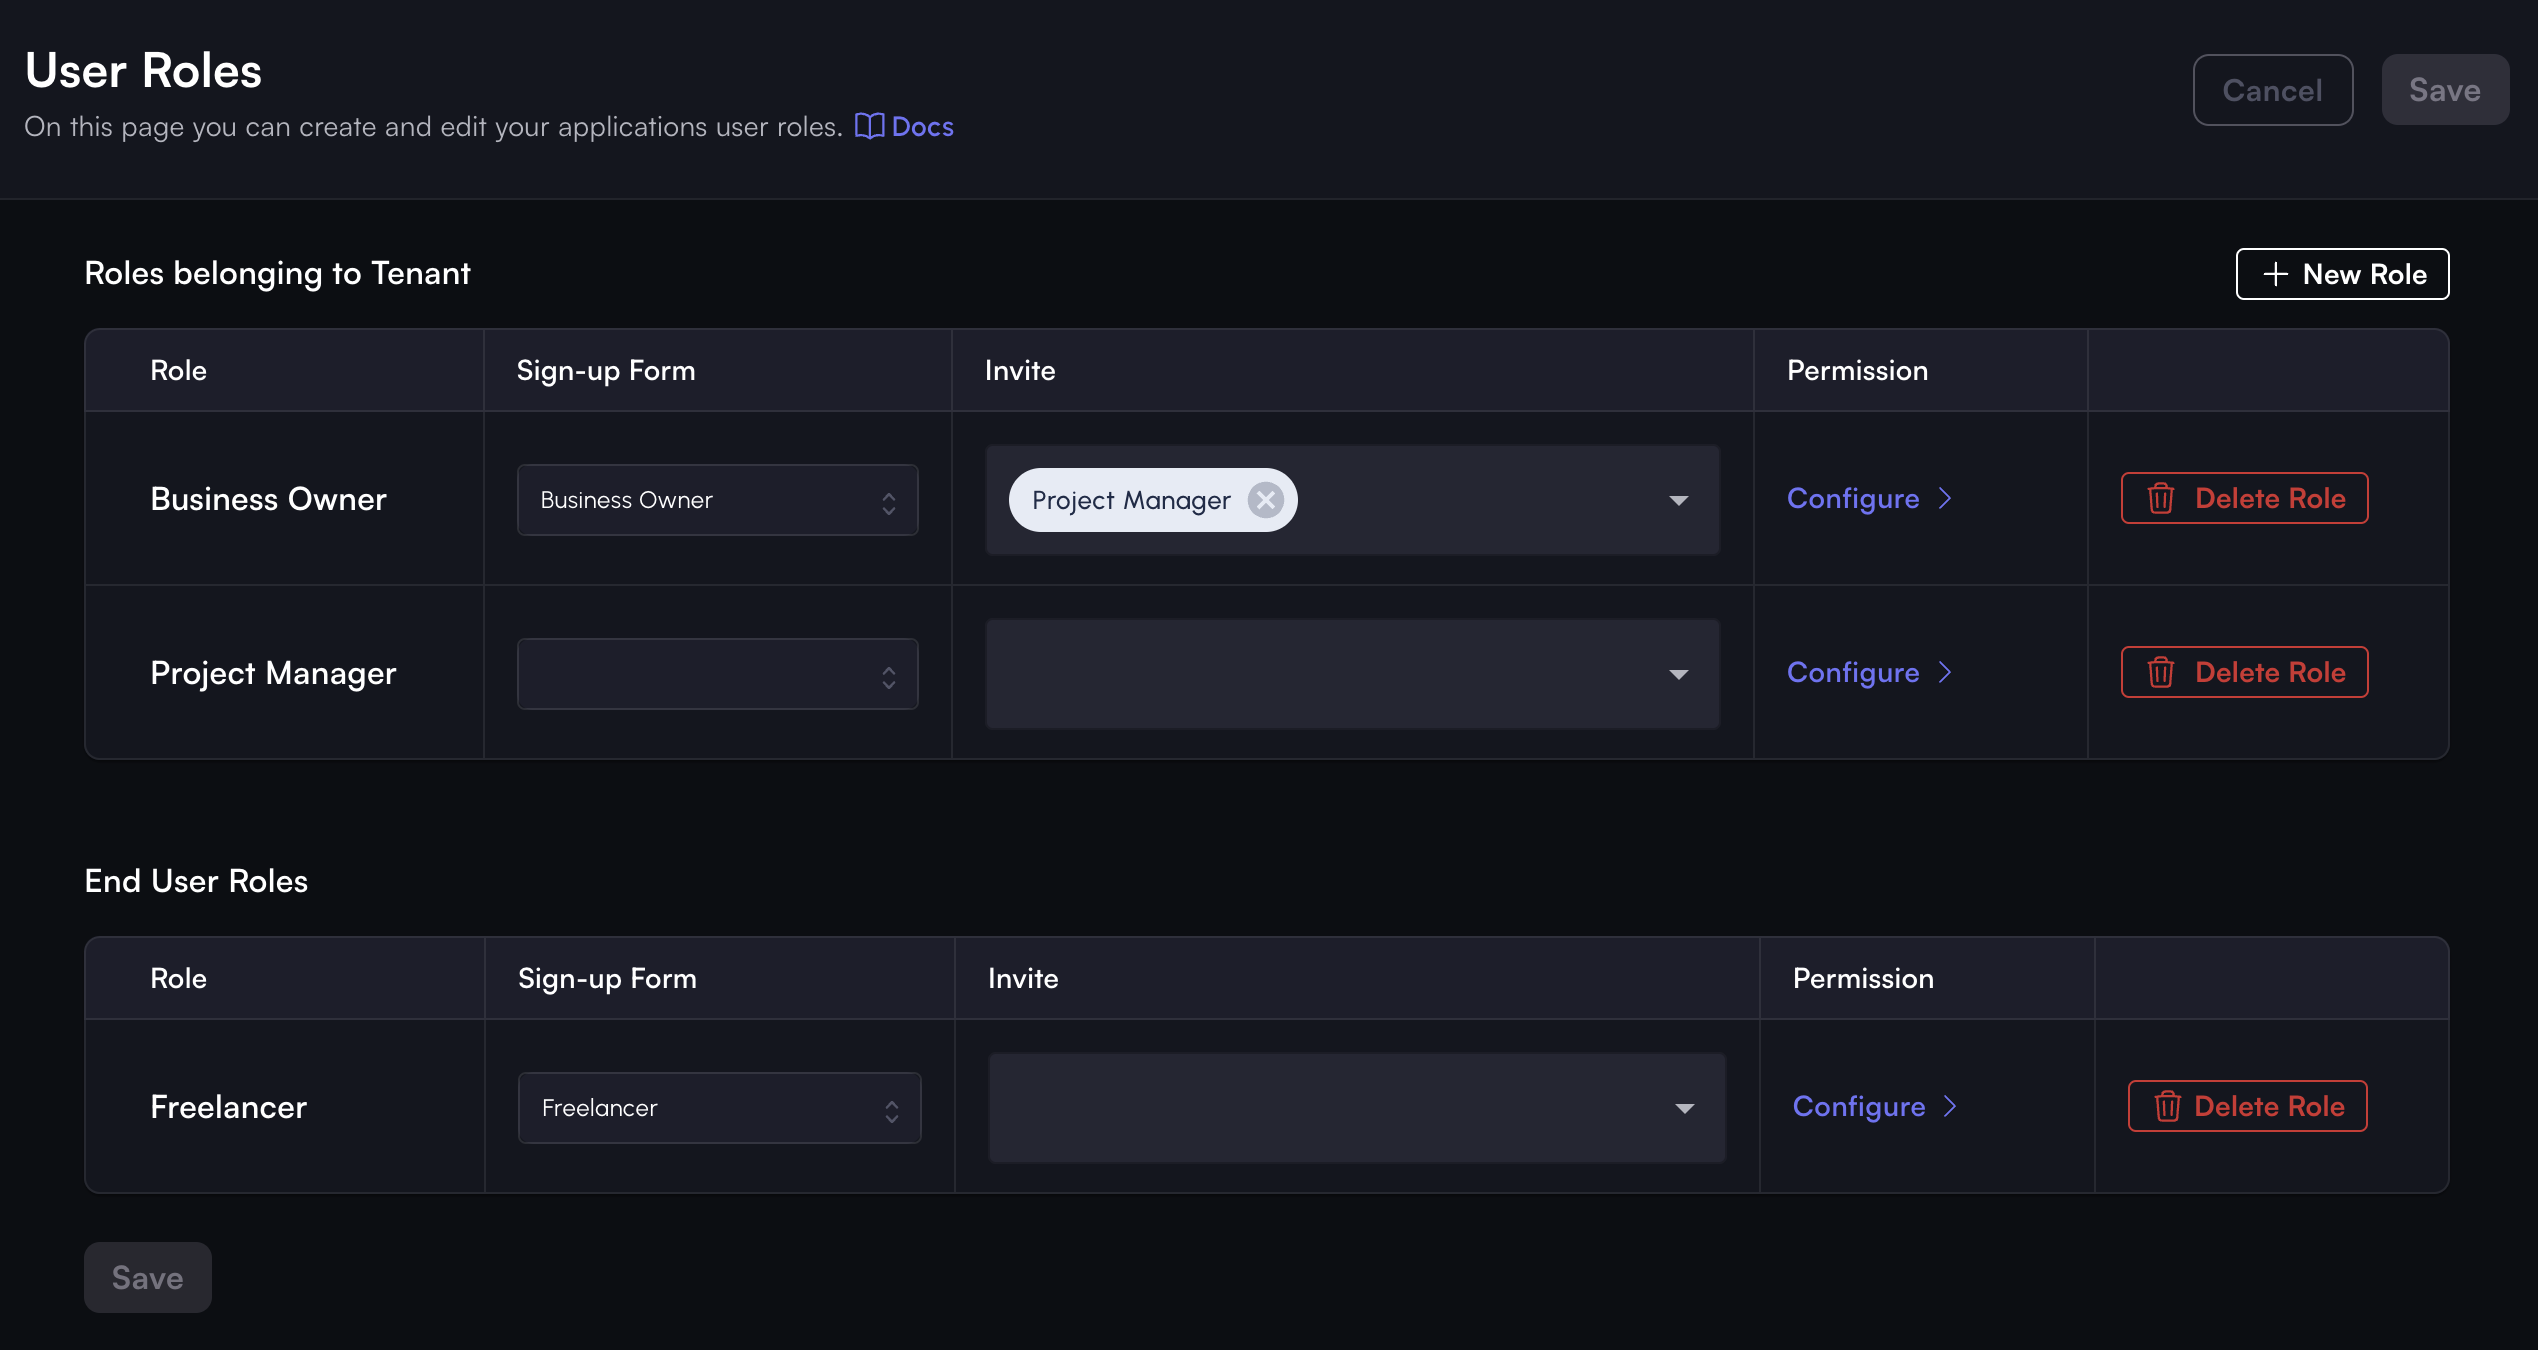
Please note that each roles will have different registration form variants. This make sure that the user will be able to register or signin with the correct role. For example, the Business Owner will have the business-owner registration form variant and the Freelancer will have the freelancer registration form variant.
Configure project schema
To change the data model, you need to acces the schema editor. Go to the ROQ Console (opens in a new tab) and click the Schema Editor menu.
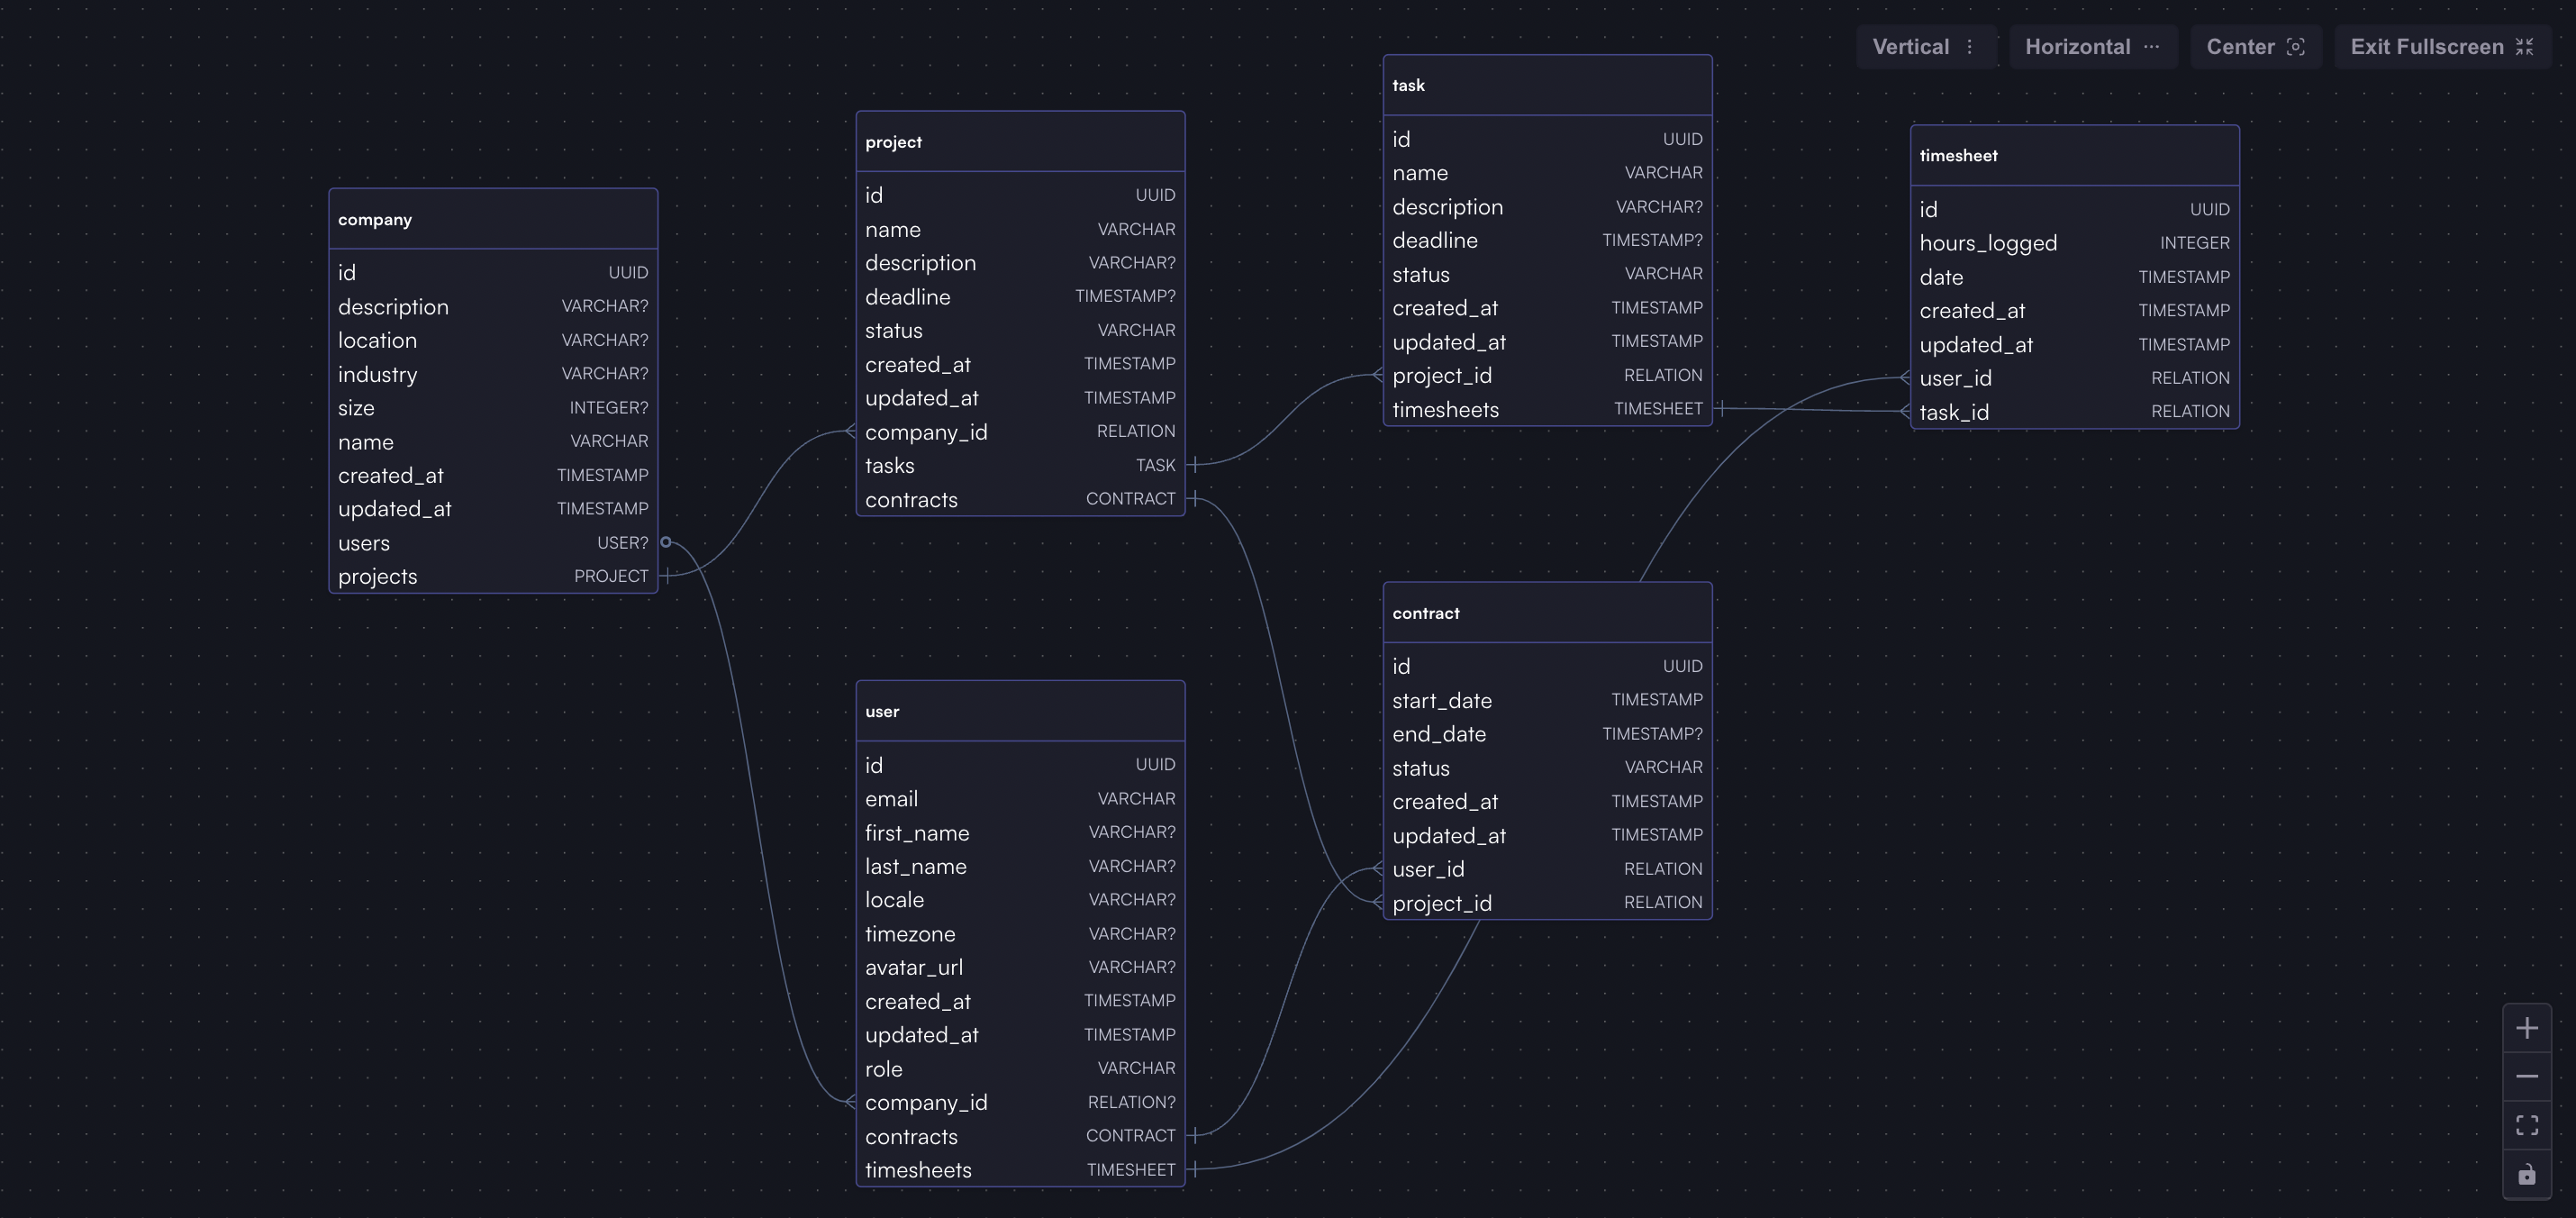
Make sure to publish any changes, it will take a while and ROQ will notify you via email when the changes are published.
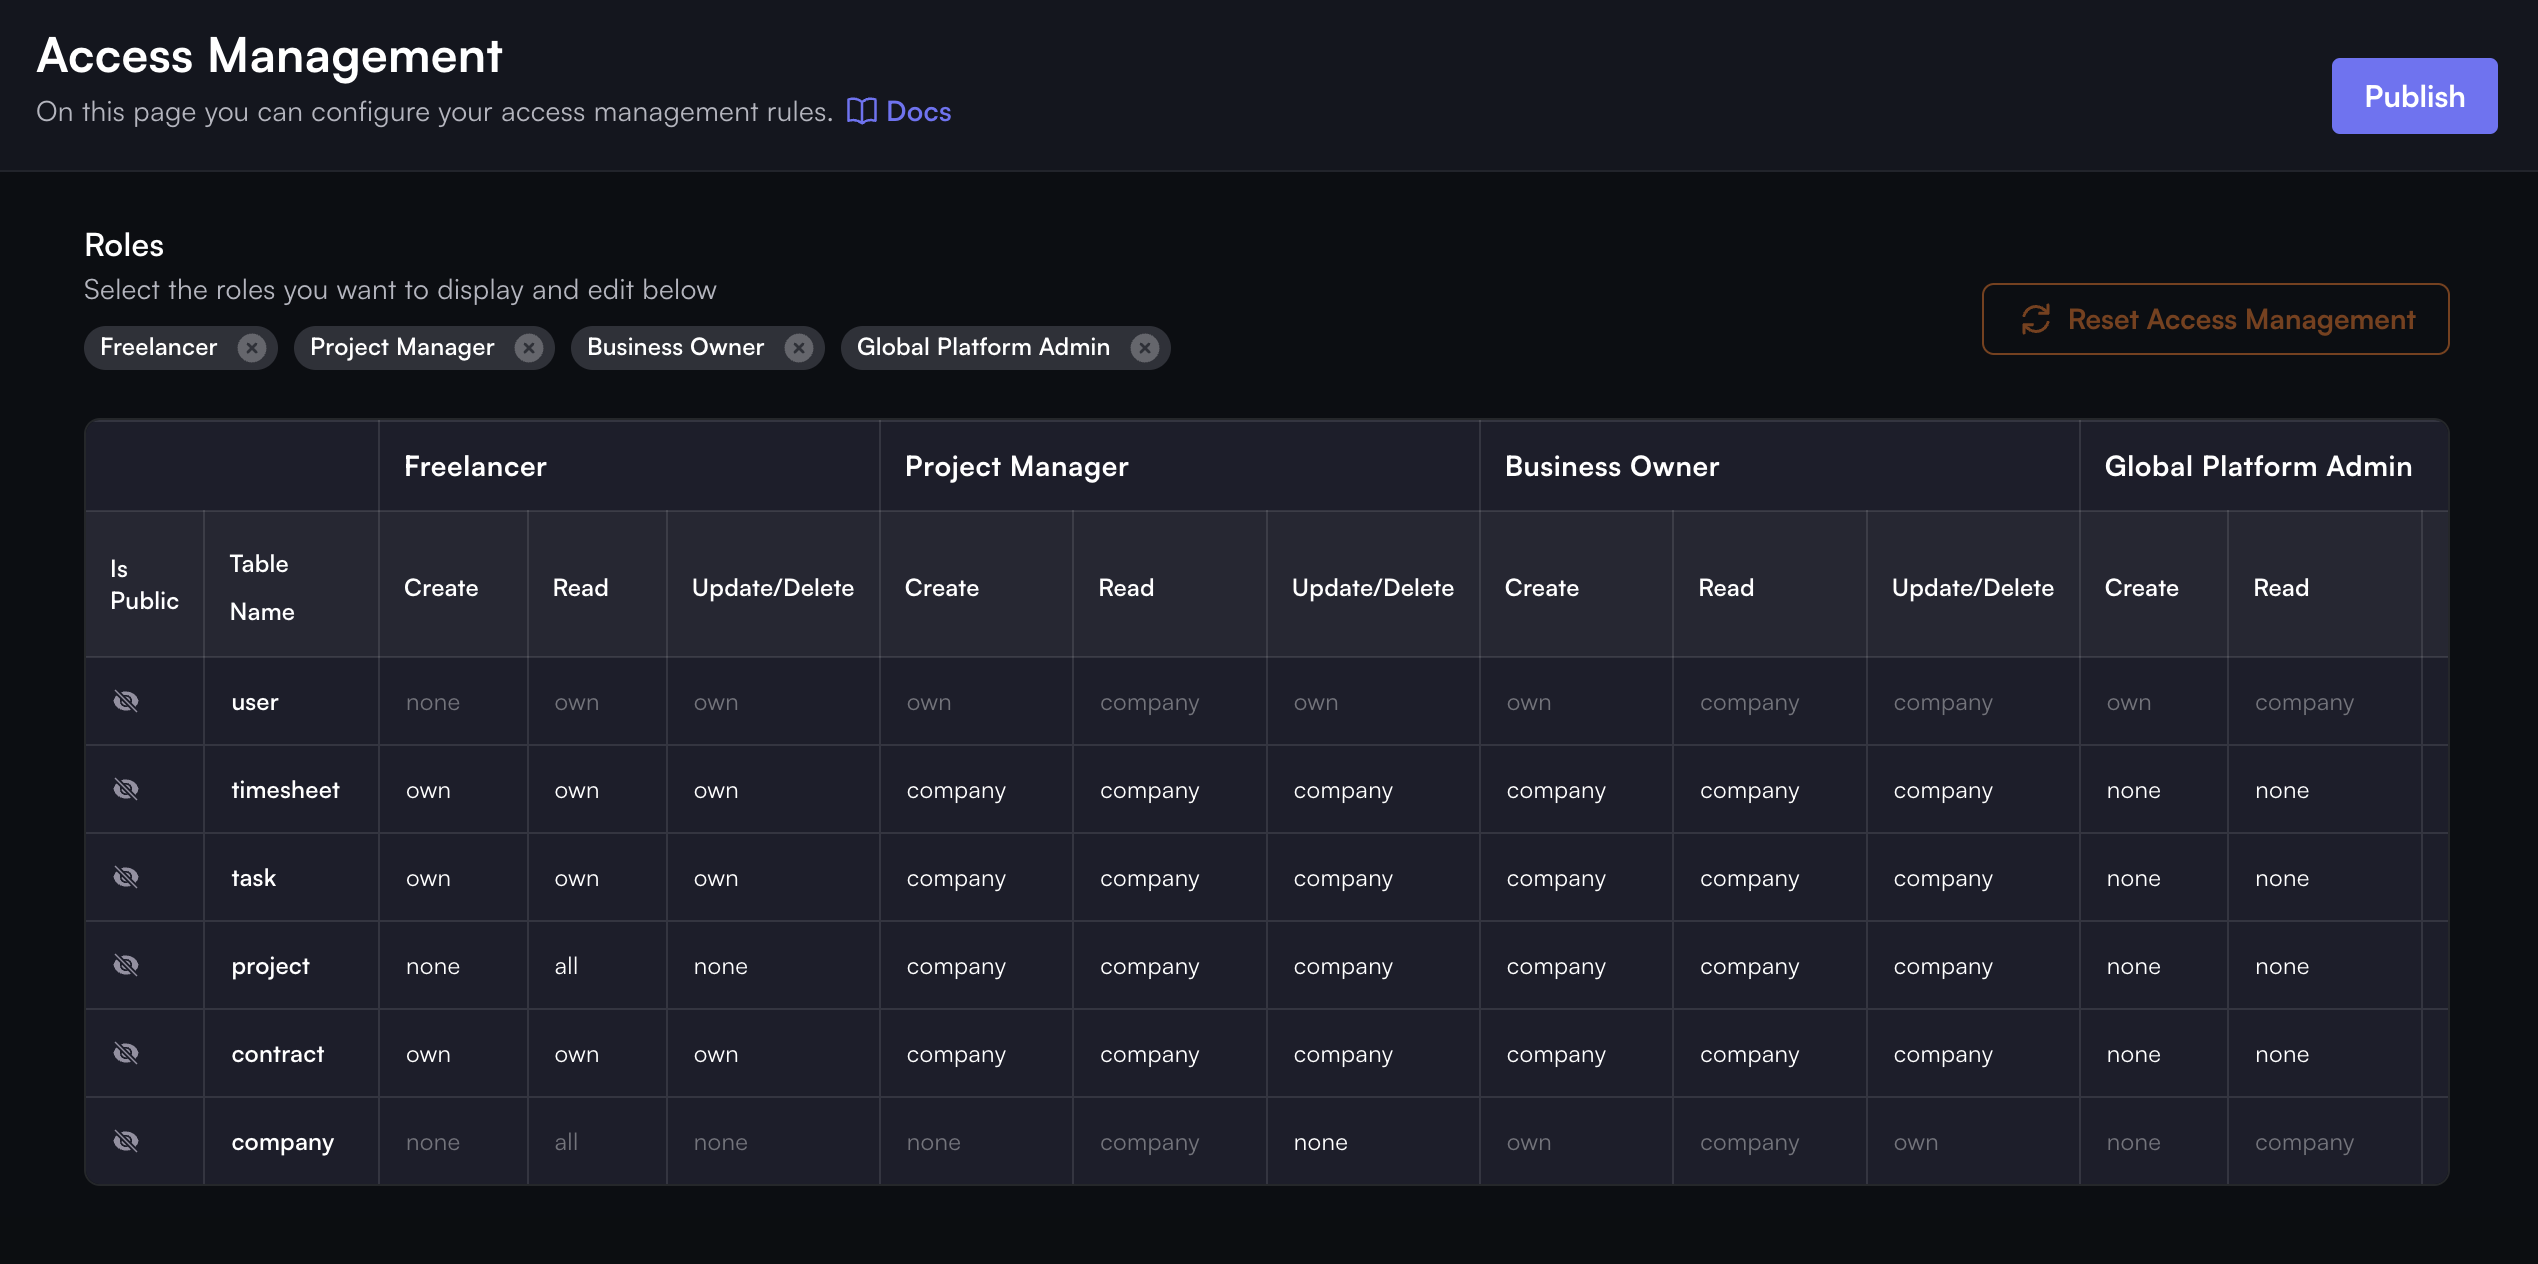
Configure access management
Next, we need to configure the access management for users and make sure to publish any changes.
Next.js quickstart
For further development, we should create another clean Next.js application outside the ROQ Console.
We will use Next.js with App Router in this tutorial. Please, read this Next.js quickstart to initialize the Next.js application with signup, login, and logout features.
Code changes
There are a few changes to the login page's src/app/page.tsx. We need to replace the role for sign-in and sign-up process with the role we created in the project setup, which is business-owner, and change the redirect page postLoginRedirect to /projects:
import { roqBrowserClient } from "@/lib/roq/roq-client";

export default function Home() {

  const handleSignUp = async () => {
    await roqBrowserClient.signUp('business-owner', { postLoginRedirect: 'http://locallhost:3000/projects' });
  };

  const handleSignIn = async () => {
    await roqBrowserClient.signIn('business-owner', { postLoginRedirect: 'http://localhost:3000/projects' });
  };

  return (
    {/* the code here is the same as before */}
  );
}
Building project form
Now that we have a basic understanding of how to save data to ROQ let's build a form to save data to ROQ.
Create a project form component
Create a project-form.tsx file in the same folder as src/app/page.tsx and add the following code:
import React from 'react';
import { ProjectFormProps } from '@/interface/project-data-types';
import { v4 as uuidv4 } from 'uuid';

export default function ProjectForm({ projectData, onSubmit, status }: ProjectFormProps) {

    const handleSubmit = (e) => {
        e.preventDefault();
        const formData = {
            id: uuidv4(),
            name: e.target.name.value,
            description: e.target.description.value,
            status: e.target.status.value,
            deadline: new Date(e.target.deadline.value),
          };

        onSubmit(formData);
    };

    return (
        <div className="flex flex-col justify-center items-center h-screen bg-zinc-950 px-4">
            <div className="w-full max-w-lg">
                <h1 className="text-white text-xl font-bold my-4">Create Project</h1>
                <form onSubmit={handleSubmit} className="flex flex-col gap-4 bg-zinc-800 p-6 rounded shadow-lg w-full max-w-lg">
                    <div className="flex flex-col gap-2">
                        <label htmlFor="name" className="text-gray-400">Name</label>
                        <input type="text" id="name" defaultValue={projectData.name} className="bg-zinc-950 text-white border border-gray-600 rounded p-2" />
                    </div>

                    <div className="flex flex-col gap-2">
                        <label htmlFor="description" className="text-gray-400">Description</label>
                        <textarea id="description" defaultValue={projectData.description} className="bg-zinc-950 text-white border border-gray-600 rounded p-2" />
                    </div>

                    <div className="flex flex-col gap-2">
                        <label htmlFor="status" className="text-gray-400">Status</label>
                        <select id="status" defaultValue={projectData.status} className="bg-zinc-950 text-white border border-gray-600 rounded p-2">
                            <option value="open">Open</option>
                            <option value="inprogress">In Progress</option>
                            <option value="active">Active</option>
                            <option value="inactive">Inactive</option>
                            <option value="completed">Completed</option>
                            <option value="cancelled">Cancelled</option>
                            <option value="onhold">On Hold</option>
                            <option value="pending">Pending</option>
                        </select>
                    </div>

                    <div className="flex flex-col gap-2">
                        <label htmlFor="deadline" className="text-gray-400">Deadline</label>
                        <input type="date" id="deadline" defaultValue={projectData.deadline ? projectData.deadline.split('T')[0] : ''} className="bg-zinc-950 text-white border border-gray-600 rounded p-2" />
                    </div>

                    {status && (
                        <div className={`p-3 rounded ${status.type === 'success' ? 'bg-green-500' : 'bg-red-500'} text-white`}>
                            {status.message}
                        </div>
                    )}

                    <button type="submit" className="px-4 py-2 bg-indigo-500 text-white rounded shadow">Save</button>
                </form>
            </div>
        </div>
    );
}
This component basically renders a form with the project data and a submit button. The onSubmit prop is a function that will be called when the form is submitted. The project form only creates a new project with a company relation but without a relation such as a task entity.
We need also install uuid npm package to generate a unique ID for the freelance project. Run the following command to install the package:
npm i --save uuid
npm i --save-dev @types/uuid
Create a project page
To use the ProjectForm component, we need to create a page that renders the form. Create a src/app/projects/page.tsx file and add the following code:
import { roqBrowserClient } from "@/lib/roq/roq-client";
import { useSession } from '@/lib/roq/roq-hooks';
import { useState } from 'react';
import ProjectForm from '../project-form';
import { ItemType, StatusMessageType } from '@/interface/project-data-types';

export default function Projects() {

  const { session } = useSession();
  const [currentProject, setCurrentProject] = useState([]);
  const [status, setStatus] = useState<StatusMessageType | null>(null);

  const company_id = session?.user.tenantId || '';
  const roles = session?.user.roles || [];

  const logoutHandler = () => {
    roqBrowserClient.signOut();
  };

  const handleFormSubmit = async (projectData: ItemType) => {
    try {
      projectData.company_id = company_id;
      console.log(projectData)
      const project = await roqBrowserClient.project.create({
        data: projectData
      });

      console.log(projectData);
      setStatus({ message: 'Project saved successfully!', type: 'success' });

      setTimeout(() => {
        setStatus(null);
      }, 3000);

    } catch (error) {
      console.error('Error submitting project:', error);
      setStatus({ message: 'Error saving project.', type: 'error' });
    }
  };

  return (
    <div className="flex flex-col w-full h-screen bg-zinc-950">
    <nav className="flex justify-between items-center p-4 bg-zinc-800 shadow">
      <h1 className="text-white text-xl font-bold">Freelancer Inc.</h1>
      <div className="flex items-center gap-4">
        <div>
          <p className="text-gray-400 text-sm">
            Logged in as: <span className="text-white">{session?.user.email}</span>
          </p>
          <p className="text-gray-400 text-sm">
            Role: <span className="text-white">{roles[0]}</span>
          </p>
        </div>
        <button onClick={logoutHandler} className="px-3 py-1 bg-indigo-500 rounded shadow text-white font-bold">
          Log out
        </button>
      </div>
    </nav>
    <ProjectForm projectData={currentProject} onSubmit={handleFormSubmit} status={status}/>
  </div>

  );
}
This page renders the ProjectForm component and passes the handleFormSubmit function as the onSubmit prop. The handleFormSubmit function will be called when the form is submitted, saving the project data to ROQ.
Add interface for project data
This project uses TypeScript, so we need to create an interface for project data types. Create a project-data-types.ts file in src/app/interface folder and add the following code:
interface ItemType {
    id: string;
    name: string;
    description: string | null;
    deadline: Date | null;
    status: string;
    company_id: string;
    created_at?: Date;
    updated_at?: Date;
}

type StatusMessageType = {
    message: string;
    type: 'success' | 'error';
};

type ProjectFormProps = {
    projectData: ItemType;
    onSubmit: (formData: ItemType) => void;
    status?: StatusMessageType;
};

export type { ItemType, StatusMessageType, ProjectFormProps };
Then we can import the interface in project-form.tsx and src/app/projects/page.tsx files :
import { ProjectFormProps, ItemType, StatusMessageType } from '@/interface/project-data-types';What have we built?
If you follow this tutorial, you should have a project form that looks like this:
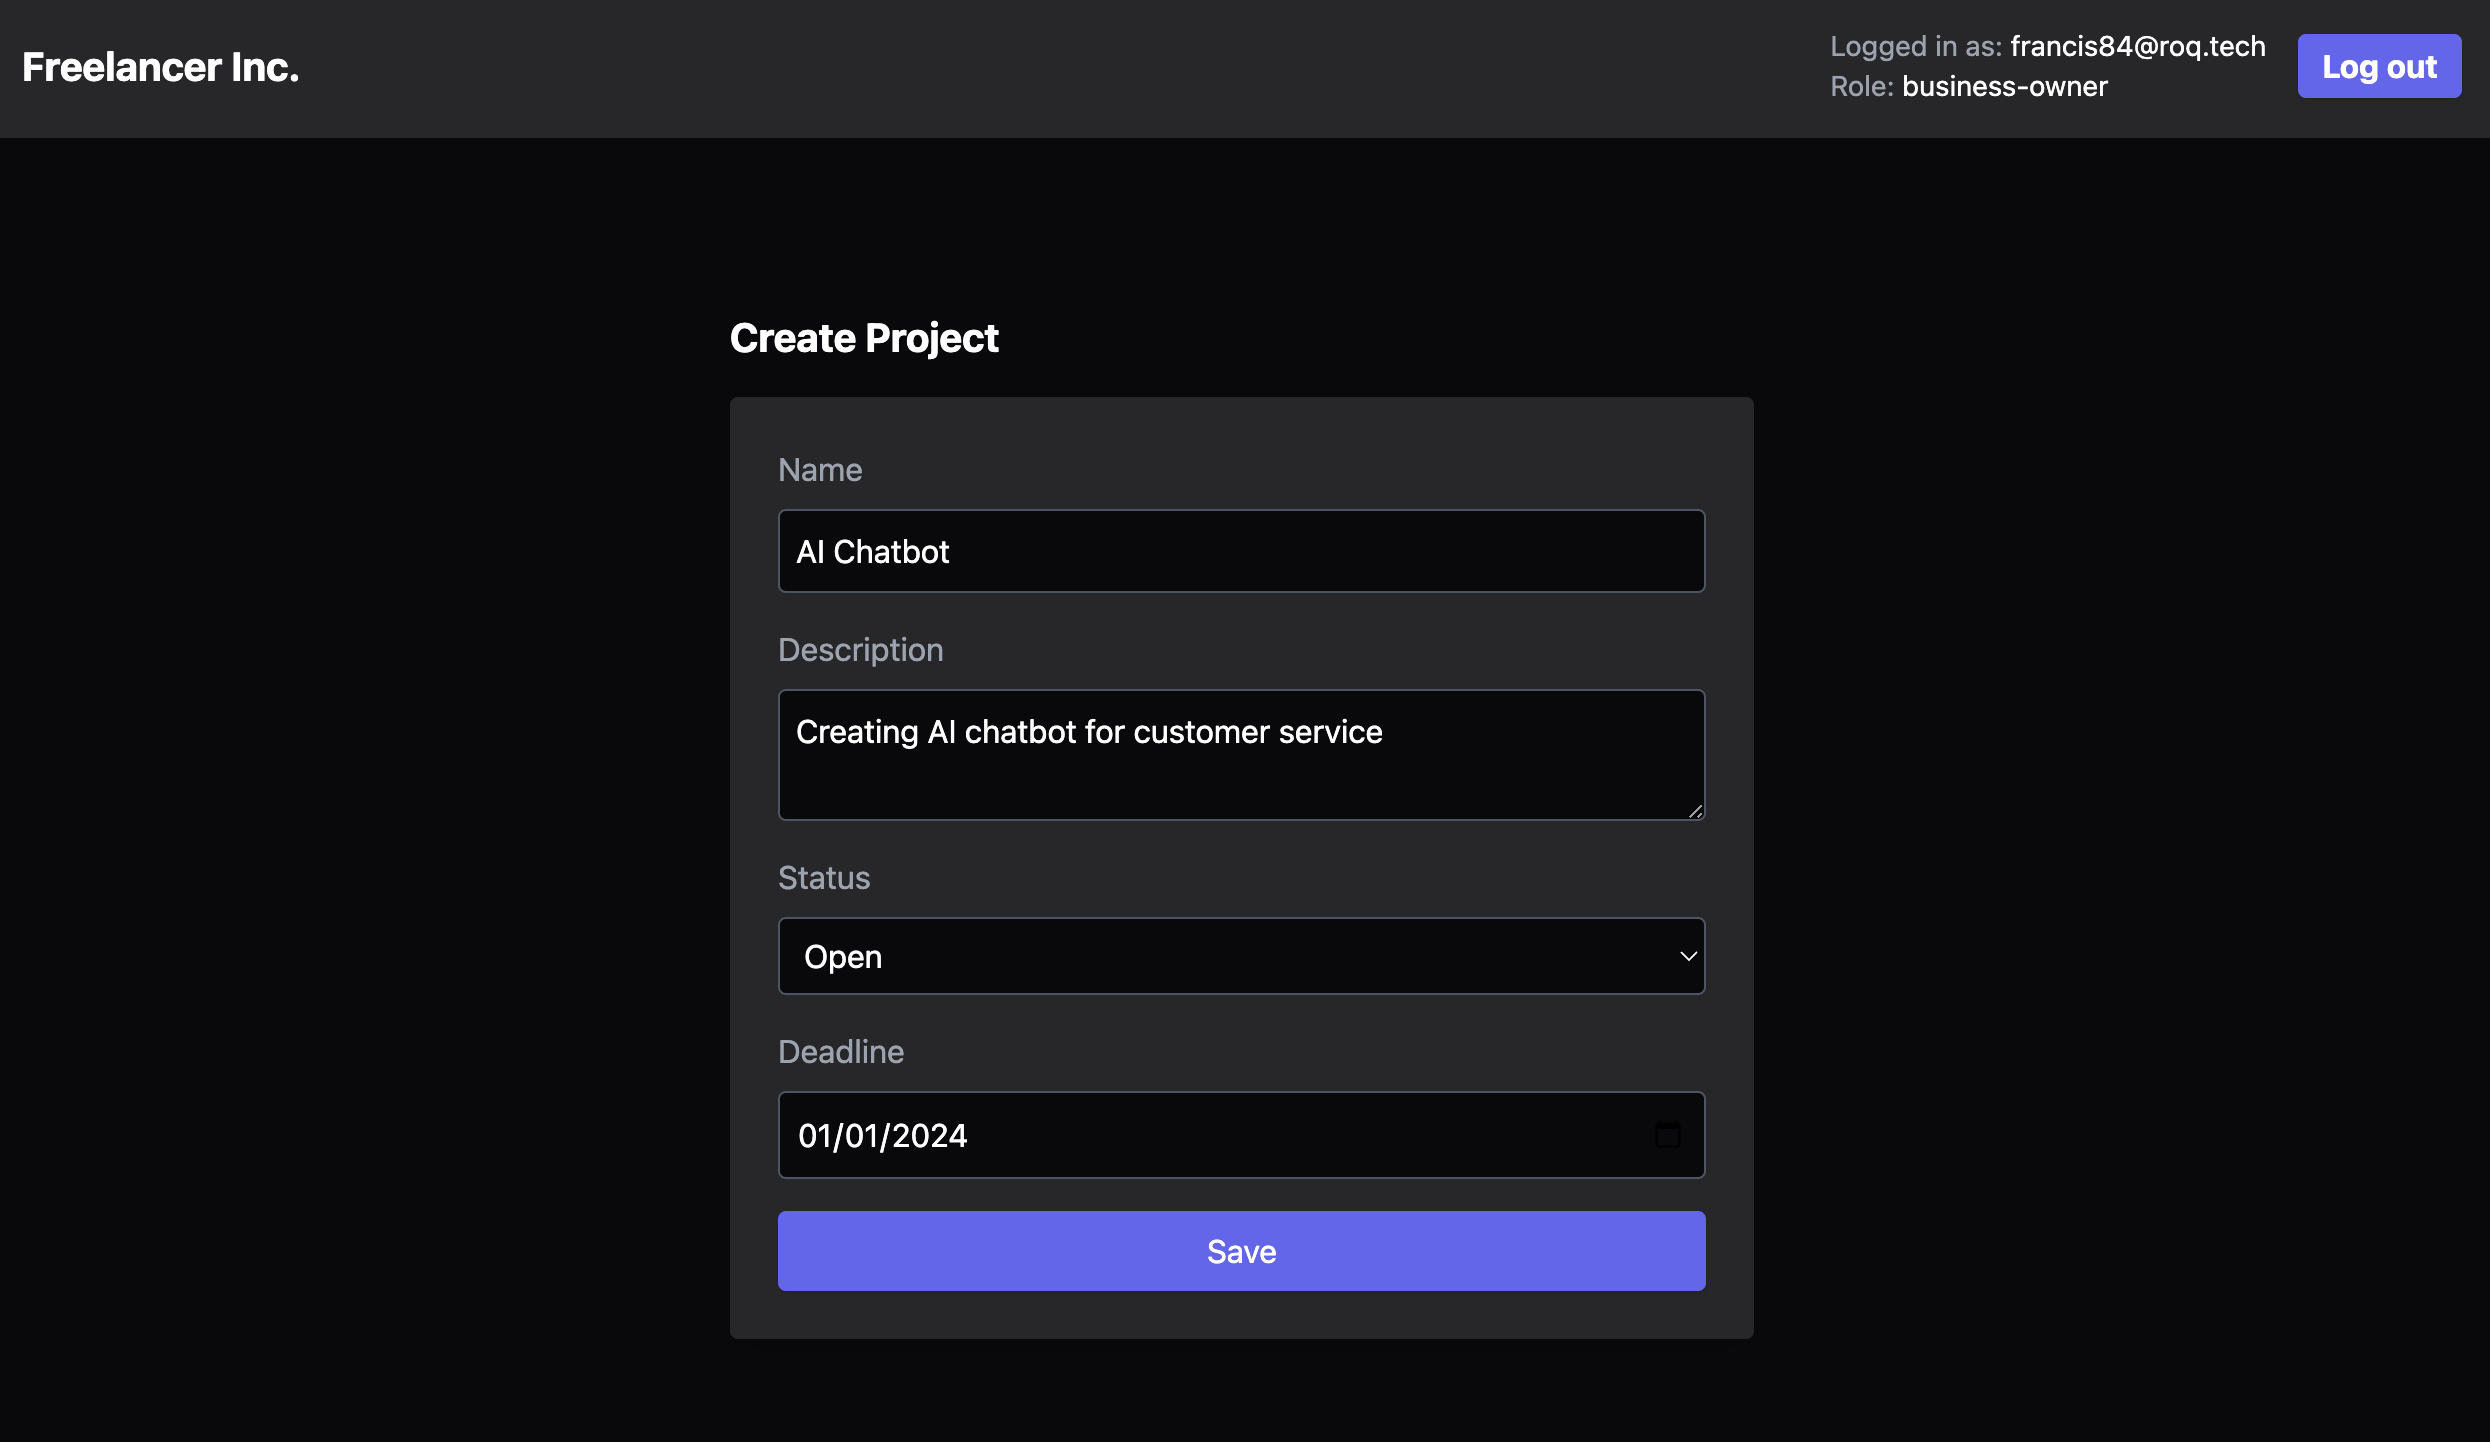
For now, we can only check the response data from the browser console. The response data from the browser console:
{
    "id": "7edd49af-4f44-4887-b80b-48e279999614",
    "name": "AI Chatbot",
    "description": "Creating AI chatbot for customer service",
    "deadline": "2024-01-01T00:00:00.000Z",
    "status": "open",
    "company_id": "22d80a45-0cf6-445d-a5db-f1091c6cb5d6",
    "created_at": "2023-11-11T14:28:12.654Z",
    "updated_at": "2023-11-11T14:28:12.654Z"
}
We will include a project list for freelancers in the next section.